
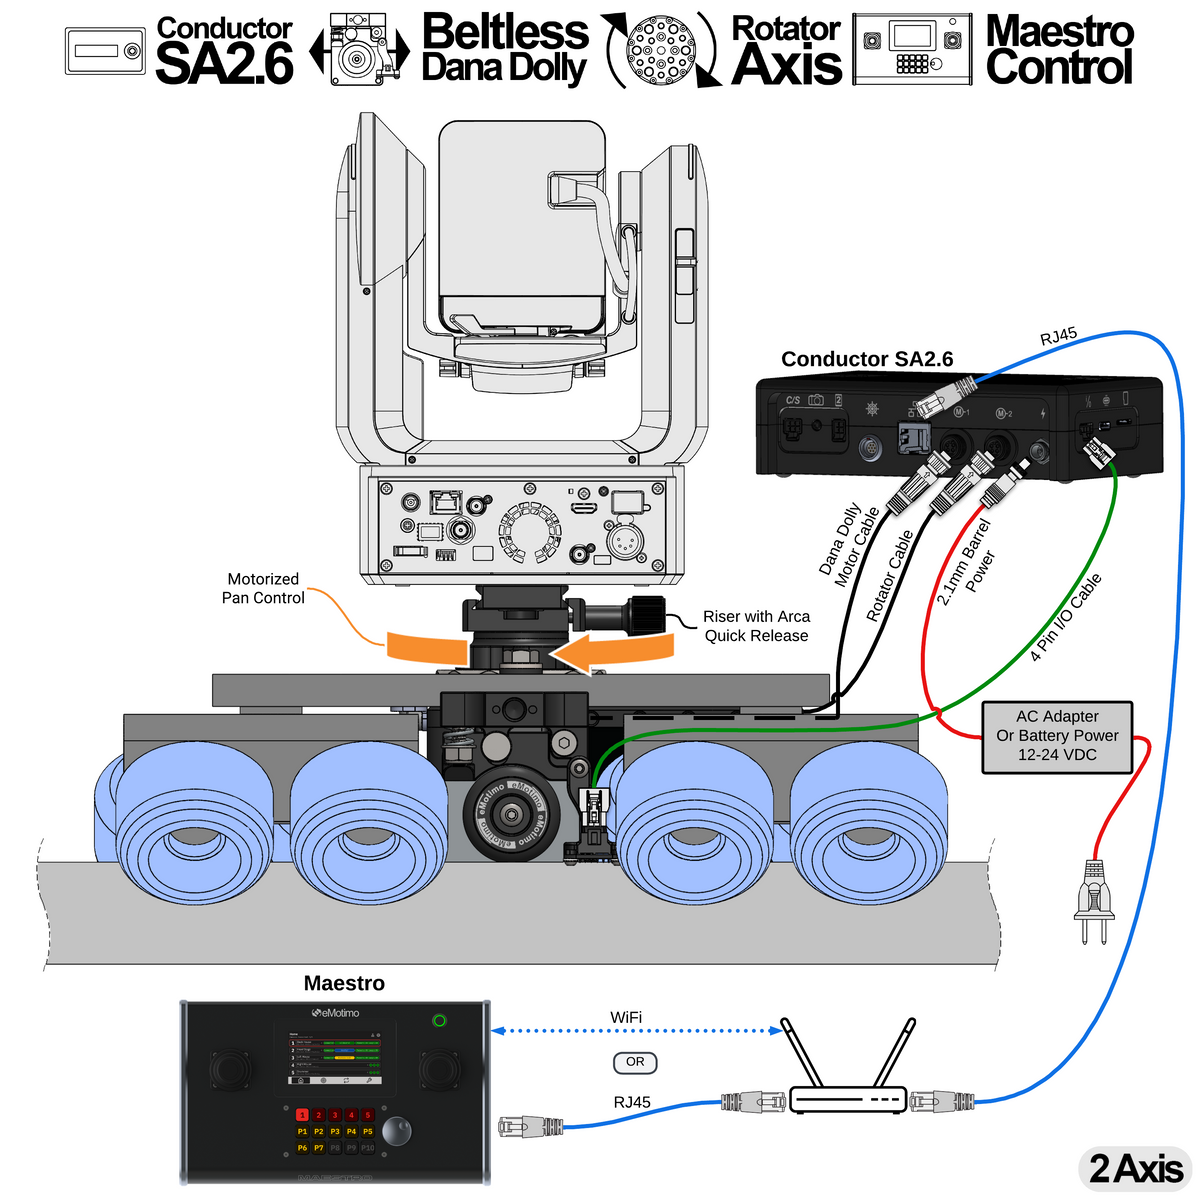
A15.0: Control Coordinated Slide and Pan for a PTZ Camera with Maestro

Features:
- Motorized beltless Dana Dolly with track sensors
- Coordinated slide and pan motion from the eMotimo Rotator; use the PTZ camera’s own controls for its other axes
- Physical inputs for every eMotimo axis of control
- Tune live-control speed and feel for each axis, map axes to the preferred inputs, and reverse direction when needed
- Maestro automatically discovers eMotimo controllers on the same network
- Set and recall 30 timed, cinematic presets
- Set and run 8 timed, cinematic loops
- Power-on positioning gets the system ready within five minutes of startup. Saved presets and loops load automatically, so operators do not have to recreate their shots each time they power on.
- Switch between connected camera rigs from Maestro’s touchscreen or built-in Stream Deck keys
- Wall power for Conductor SA2.6 and the PTZ camera
What do you need from eMotimo?
- Maestro Network Controller
- Conductor SA2.6 + Dana Dolly Integration + Rotator
- Riser with Clamp and 100 mm Arca Plate (recommended for mounting the PTZ camera)
What else do you need from a third party?
- Dana Dolly with round track and stands
- PTZ camera of your choice
- Ethernet cabling and a network connection for Maestro and Conductor SA2.6
- Wall power for Conductor SA2.6 and the PTZ camera (Conductor AC adapter included with the bundle; use the camera’s compatible AC supply)
Steps to program:
- Power on Conductor SA2.6 and Maestro on the same network. Maestro discovers the controller automatically.
- Select the rig on Maestro. Use its physical inputs to frame the shot and adjust axis mapping, speed, and feel.
- Save the start and end positions as timed presets.
- Create a loop between those presets and set its move timing.
- Start and stop the loop from Maestro’s built-in Stream Deck keys.
At the next startup, power-on positioning restores the saved setup and gets the rig ready within five minutes.
A15.1: PTZ Mover with AutoPan and Bitfocus Companion Control

Features:
- Position the PTZ camera remotely or run a ping-pong AutoDolly loop
- eMotimo Rotator pans in coordination with slide to maintain framing in a loop (AutoPan)
- Motorized beltless Dana Dolly with track sensors
-
Cinematic Studio Ready
- Live control
- Set and recall 30 timed, cinematic presets
- Set and recall 8 timed, cinematic loops (ping-pong)
- Control over a wired network with Bitfocus Companion or locally with the included gaming controller
- Wall power for Conductor SA2.6 and the PTZ camera
What do you need from eMotimo?
- Conductor SA2.6 + Dana Dolly Integration + Rotator
- Riser with Clamp and 100mm Arca Plate (recommended for mounting PTZ to eMotimo Rotator)
What else do you need from a third party?
- Dana Dolly with round track and stands
- PTZ camera of your choice
- Computer with Bitfocus Companion installed
- Elgato Stream Deck XL (recommended for Bitfocus Companion)
- Wall power for Conductor SA2.6 and the PTZ camera (Conductor AC adapter included with the bundle; use the camera’s compatible AC supply)
Steps to program:
- Power on Conductor SA2.6 and connect the computer running Bitfocus Companion to the same wired network.
- Configure the eMotimo connection and assign live-control, preset, and loop actions through the Stream Deck.
- Use Companion to frame two positions and set a preset at each one.
- Use Companion’s loop actions to select those presets as the endpoints and set the move timing.
- Start and stop the loop through the connected Stream Deck.
For network controller configuration, see the Bitfocus Companion setup guide.
A15.2: PTZ Mover with AutoPan and Skaarhoj Control

Features:
- Position the PTZ camera remotely or run a ping-pong AutoDolly loop
- eMotimo Rotator pans in coordination with slide to maintain framing in a loop (AutoPan)
- Motorized beltless Dana Dolly with track sensors
-
Cinematic Studio Ready
- Live control
- Set and recall 30 timed, cinematic presets
- Set and recall 8 timed, cinematic loops (ping-pong)
- Control over a wired network with Bitfocus Companion or locally with the included gaming controller
- Wall power for Conductor SA2.6 and the PTZ camera
What do you need from eMotimo?
- Conductor SA2.6 + Dana Dolly Integration + Rotator
- Riser with Clamp and 100mm Arca Plate (recommended for mounting PTZ to eMotimo Rotator)
What else do you need from a third party?
- Dana Dolly with round track and stands
- PTZ camera of your choice
- Skaarhoj controller (PTZ Fly or PTZ Extreme recommended)
- Wall power for Conductor SA2.6 and the PTZ camera (Conductor AC adapter included with the bundle; use the camera’s compatible AC supply)
Steps to program:
- Power on Conductor SA2.6 and connect the Skaarhoj controller to the same wired network.
- Use the Skaarhoj controls to frame two positions and set a preset at each one.
- On the Skaarhoj looping page, select a loop and assign the two presets as points A and B.
- Set the loop timing, then start and stop the loop from Skaarhoj.
For network controller configuration, see the Skaarhoj setup guide.
A15.3: AutoDolly with AutoPan and FIZ Control over a Network with Bitfocus Companion

Features:
- Position the camera remotely or run a ping-pong AutoDolly loop
- eMotimo Rotator pans in coordination with slide to maintain framing in a loop (AutoPan)
- Motorized beltless Dana Dolly with track sensors
-
Cinematic Studio Ready
- Live control
- Set and recall 30 timed, cinematic presets
- Set and recall 8 timed, cinematic loops (ping-pong)
- Control over a wired network with Bitfocus Companion or locally with the included gaming controller
- Battery or AC operation
- Supports camera payloads up to 30 lb
- Powers and controls Tilta Nucleus-M and Nucleus-M II FIZ motors
What do you need from eMotimo?
What else do you need from a third party?
-
Dana Dolly with round track and stands
- Flat base tripod head with 3/8"-16 mounting hole
- Two Tilta Nucleus-M or Nucleus-M II motors and the required cables
- V-Mount or Gold Mount battery with D-Tap output for battery operation or AC power solution for Conductor SA2.6 and PTZ
- Computer with Bitfocus Companion installed
- Elgato Stream Deck XL (recommended for Bitfocus Companion)
Steps to program:
- Power on Conductor SA2.6 and connect the computer running Bitfocus Companion to the same wired network.
- Configure the eMotimo connection and assign live-control, preset, and loop actions through the Stream Deck.
- Use Companion to frame two positions and set a preset at each one.
- Use Companion’s loop actions to select those presets as the endpoints and set the move timing.
- Start and stop the loop through the connected Stream Deck.
For network controller configuration, see the Bitfocus Companion setup guide.
A15.4: AutoDolly with AutoPan and FIZ Control over a Network with Skaarhoj

Features:
- Position the camera remotely or run a ping-pong AutoDolly loop
- eMotimo Rotator pans in coordination with slide to maintain framing in a loop (AutoPan)
- Motorized beltless Dana Dolly with track sensors
-
Cinematic Studio Ready
- Live control
- Set and recall 30 timed, cinematic presets
- Set and recall 8 timed, cinematic loops (ping-pong)
- Control over a wired network with Skaarhoj or locally with the included gaming controller
- Battery or AC operation
- Supports camera payloads up to 30 lb
- Powers and controls Tilta Nucleus-M and Nucleus-M II FIZ motors
What do you need from eMotimo?
What else do you need from a third party?
-
Dana Dolly with round track and stands
- Flat base tripod head with 3/8"-16 mounting hole
- Two Tilta Nucleus-M or Nucleus-M II motors and the required cables
- V-Mount or Gold Mount battery with D-Tap output for battery operation or AC power solution for Conductor SA2.6 and PTZ
- Skaarhoj controller (PTZ Fly or PTZ Extreme recommended)
Steps to program:
- Power on Conductor SA2.6 and connect the Skaarhoj controller to the same wired network.
- Use the Skaarhoj controls to frame two positions and set a preset at each one.
- On the Skaarhoj looping page, select a loop and assign the two presets as points A and B.
- Set the loop timing, then start and stop the loop from Skaarhoj.
For network controller configuration, see the Skaarhoj setup guide.
A15.5: AutoDolly with AutoPan and FIZ Control with a Gaming Controller

Features:
- Motorized beltless Dana Dolly with track sensors
- Control and keyframe Slide/Focus/Zoom
- Battery or AC operation
- Supports camera payloads up to 30 lb
- Powers and controls Tilta Nucleus-M and Nucleus-M II FIZ motors
- Control locally with the included gaming controller
What do you need from eMotimo?
What else do you need from a third party?
- Dana Dolly with round track and stands
- Flat base tripod head with 3/8"-16 mounting hole
- Two Tilta Nucleus-M or Nucleus-M II motors and the required cables
- V-Mount or Gold Mount battery with D-Tap output for battery operation or 14–16 V DC power for Camera
Steps to program:
- Power on Conductor SA2.6 and pair the included gaming controller.
- Use the gaming controller to position the rig and select Guided Mode, then Ping-Pong.
- Set the start and end points using the gaming controller.
- Set the move speed if needed, then start the shot from the gaming controller.
A15.6: AutoDolly with AutoPan Controlled over a Network with Bitfocus Companion

Features:
- Position the camera remotely or run a ping-pong AutoDolly loop
- eMotimo Rotator pans in coordination with slide to maintain framing in a loop (AutoPan)
- Motorized beltless Dana Dolly with track sensors
-
Cinematic Studio Ready
- Live control
- Set and recall 30 timed, cinematic presets
- Set and recall 8 timed, cinematic loops (ping-pong)
- Control over a wired network with Bitfocus Companion or locally with the included gaming controller
- Battery or AC operation
- Supports camera payloads up to 30 lb
What do you need from eMotimo?
What else do you need from a third party?
-
Dana Dolly with round track and stands
- Flat base tripod head with 3/8"-16 mounting hole
- V-Mount or Gold Mount battery with D-Tap output for battery operation or AC power solution for Conductor SA2.6 and PTZ
- Computer with Bitfocus Companion installed
- Elgato Stream Deck XL (recommended for Bitfocus Companion)
Steps to program:
- Power on Conductor SA2.6 and connect the computer running Bitfocus Companion to the same wired network.
- Configure the eMotimo connection and assign live-control, preset, and loop actions through the Stream Deck.
- Use Companion to frame two positions and set a preset at each one.
- Use Companion’s loop actions to select those presets as the endpoints and set the move timing.
- Start and stop the loop through the connected Stream Deck.
For network controller configuration, see the Bitfocus Companion setup guide.
A15.7: AutoDolly with AutoPan Controlled over a Network with Skaarhoj

Features:
- Position the camera remotely or run a ping-pong AutoDolly loop
- eMotimo Rotator pans in coordination with slide to maintain framing in a loop (AutoPan)
- Motorized beltless Dana Dolly with track sensors
-
Cinematic Studio Ready
- Live control
- Set and recall 30 timed, cinematic presets
- Set and recall 8 timed, cinematic loops (ping-pong)
- Control over a wired network with Skaarhoj or locally with the included gaming controller
- Battery or AC operation
- Supports camera payloads up to 30 lb
What do you need from eMotimo?
What else do you need from a third party?
-
Dana Dolly with round track and stands
- Flat base tripod head with 3/8"-16 mounting hole
- V-Mount or Gold Mount battery with D-Tap output for battery operation or AC power solution for Conductor SA2.6 and PTZ
- Skaarhoj controller (PTZ Fly or PTZ Extreme recommended)
Steps to program:
- Power on Conductor SA2.6 and connect the Skaarhoj controller to the same wired network.
- Use the Skaarhoj controls to frame two positions and set a preset at each one.
- On the Skaarhoj looping page, select a loop and assign the two presets as points A and B.
- Set the loop timing, then start and stop the loop from Skaarhoj.
For network controller configuration, see the Skaarhoj setup guide.
A15.8: AutoDolly with AutoPan Controlled by a Gaming Controller

Features:
- Motorized beltless Dana Dolly with track sensors
- Control and keyframe Slide/Focus/Zoom
- Battery or AC operation
- Supports camera payloads up to 30 lb
- Control locally with the included gaming controller
What do you need from eMotimo?
What else do you need from a third party?
- Dana Dolly with round track and stands
- Flat base tripod head with 3/8"-16 mounting hole
- V-Mount or Gold Mount battery with D-Tap output for battery operation or 14–16 V DC power for Camera
Steps to program:
- Power on Conductor SA2.6 and pair the included gaming controller.
- Use the gaming controller to position the rig and select Guided Mode, then Ping-Pong.
- Set the start and end points using the gaming controller.
- Set the move speed if needed, then start the shot from the gaming controller.
A15.9: Control Slide, Pan, and FIZ with Maestro

Features:
- Motorized beltless Dana Dolly with track sensors
- Coordinated slide, pan, focus, and zoom motion
- Physical inputs for every eMotimo axis of control
- Tune live-control speed and feel for each axis, map axes to the preferred inputs, and reverse direction when needed
- Maestro automatically discovers eMotimo controllers on the same network
- Set and recall 30 timed, cinematic presets
- Set and run 8 timed, cinematic loops
- Power-on positioning gets the system ready within five minutes of startup. Saved presets and loops load automatically, so operators do not have to recreate their shots each time they power on.
- Switch between connected camera rigs from Maestro’s touchscreen or built-in Stream Deck keys
- Battery or AC operation for Conductor SA2.6
- Power and control for Tilta Nucleus-M and Nucleus-M II FIZ motors
- Camera payloads up to 30 lb
What do you need from eMotimo?
What else do you need from a third party?
- Dana Dolly with round track and stands
- Flat base tripod head with a compatible mount
- Two Tilta Nucleus-M or Nucleus-M II motors and the required cables
- Compatible power supply for the camera
- Ethernet cabling and a network connection for Maestro and Conductor SA2.6
Steps to program:
- Power on Conductor SA2.6 and Maestro on the same network. Maestro discovers the controller automatically.
- Select the rig on Maestro. Use its physical inputs to frame the shot and adjust axis mapping, speed, and feel.
- Save the start and end positions as timed presets.
- Create a loop between those presets and set its move timing.
- Start and stop the loop from Maestro’s built-in Stream Deck keys.
At the next startup, power-on positioning restores the saved setup and gets the rig ready within five minutes.
A15.10: Control Slide and Pan with Maestro

Features:
- Motorized beltless Dana Dolly with track sensors
- Coordinated slide and pan motion
- Physical inputs for every eMotimo axis of control
- Tune live-control speed and feel for each axis, map axes to the preferred inputs, and reverse direction when needed
- Maestro automatically discovers eMotimo controllers on the same network
- Set and recall 30 timed, cinematic presets
- Set and run 8 timed, cinematic loops
- Power-on positioning gets the system ready within five minutes of startup. Saved presets and loops load automatically, so operators do not have to recreate their shots each time they power on.
- Switch between connected camera rigs from Maestro’s touchscreen or built-in Stream Deck keys
- Battery or AC operation for Conductor SA2.6
- Camera payloads up to 30 lb
What do you need from eMotimo?
What else do you need from a third party?
- Dana Dolly with round track and stands
- Flat base tripod head with a compatible mount
- Compatible power supply for the camera
- Ethernet cabling and a network connection for Maestro and Conductor SA2.6
Steps to program:
- Power on Conductor SA2.6 and Maestro on the same network. Maestro discovers the controller automatically.
- Select the rig on Maestro. Use its physical inputs to frame the shot and adjust axis mapping, speed, and feel.
- Save the start and end positions as timed presets.
- Create a loop between those presets and set its move timing.
- Start and stop the loop from Maestro’s built-in Stream Deck keys.
At the next startup, power-on positioning restores the saved setup and gets the rig ready within five minutes.
Share:
A14 = Conductor SA2.6 + Beltless RigWheels Passport
A16 = Conductor SA2.6 + Beltless RigWheels Passport + Rotator