Summary
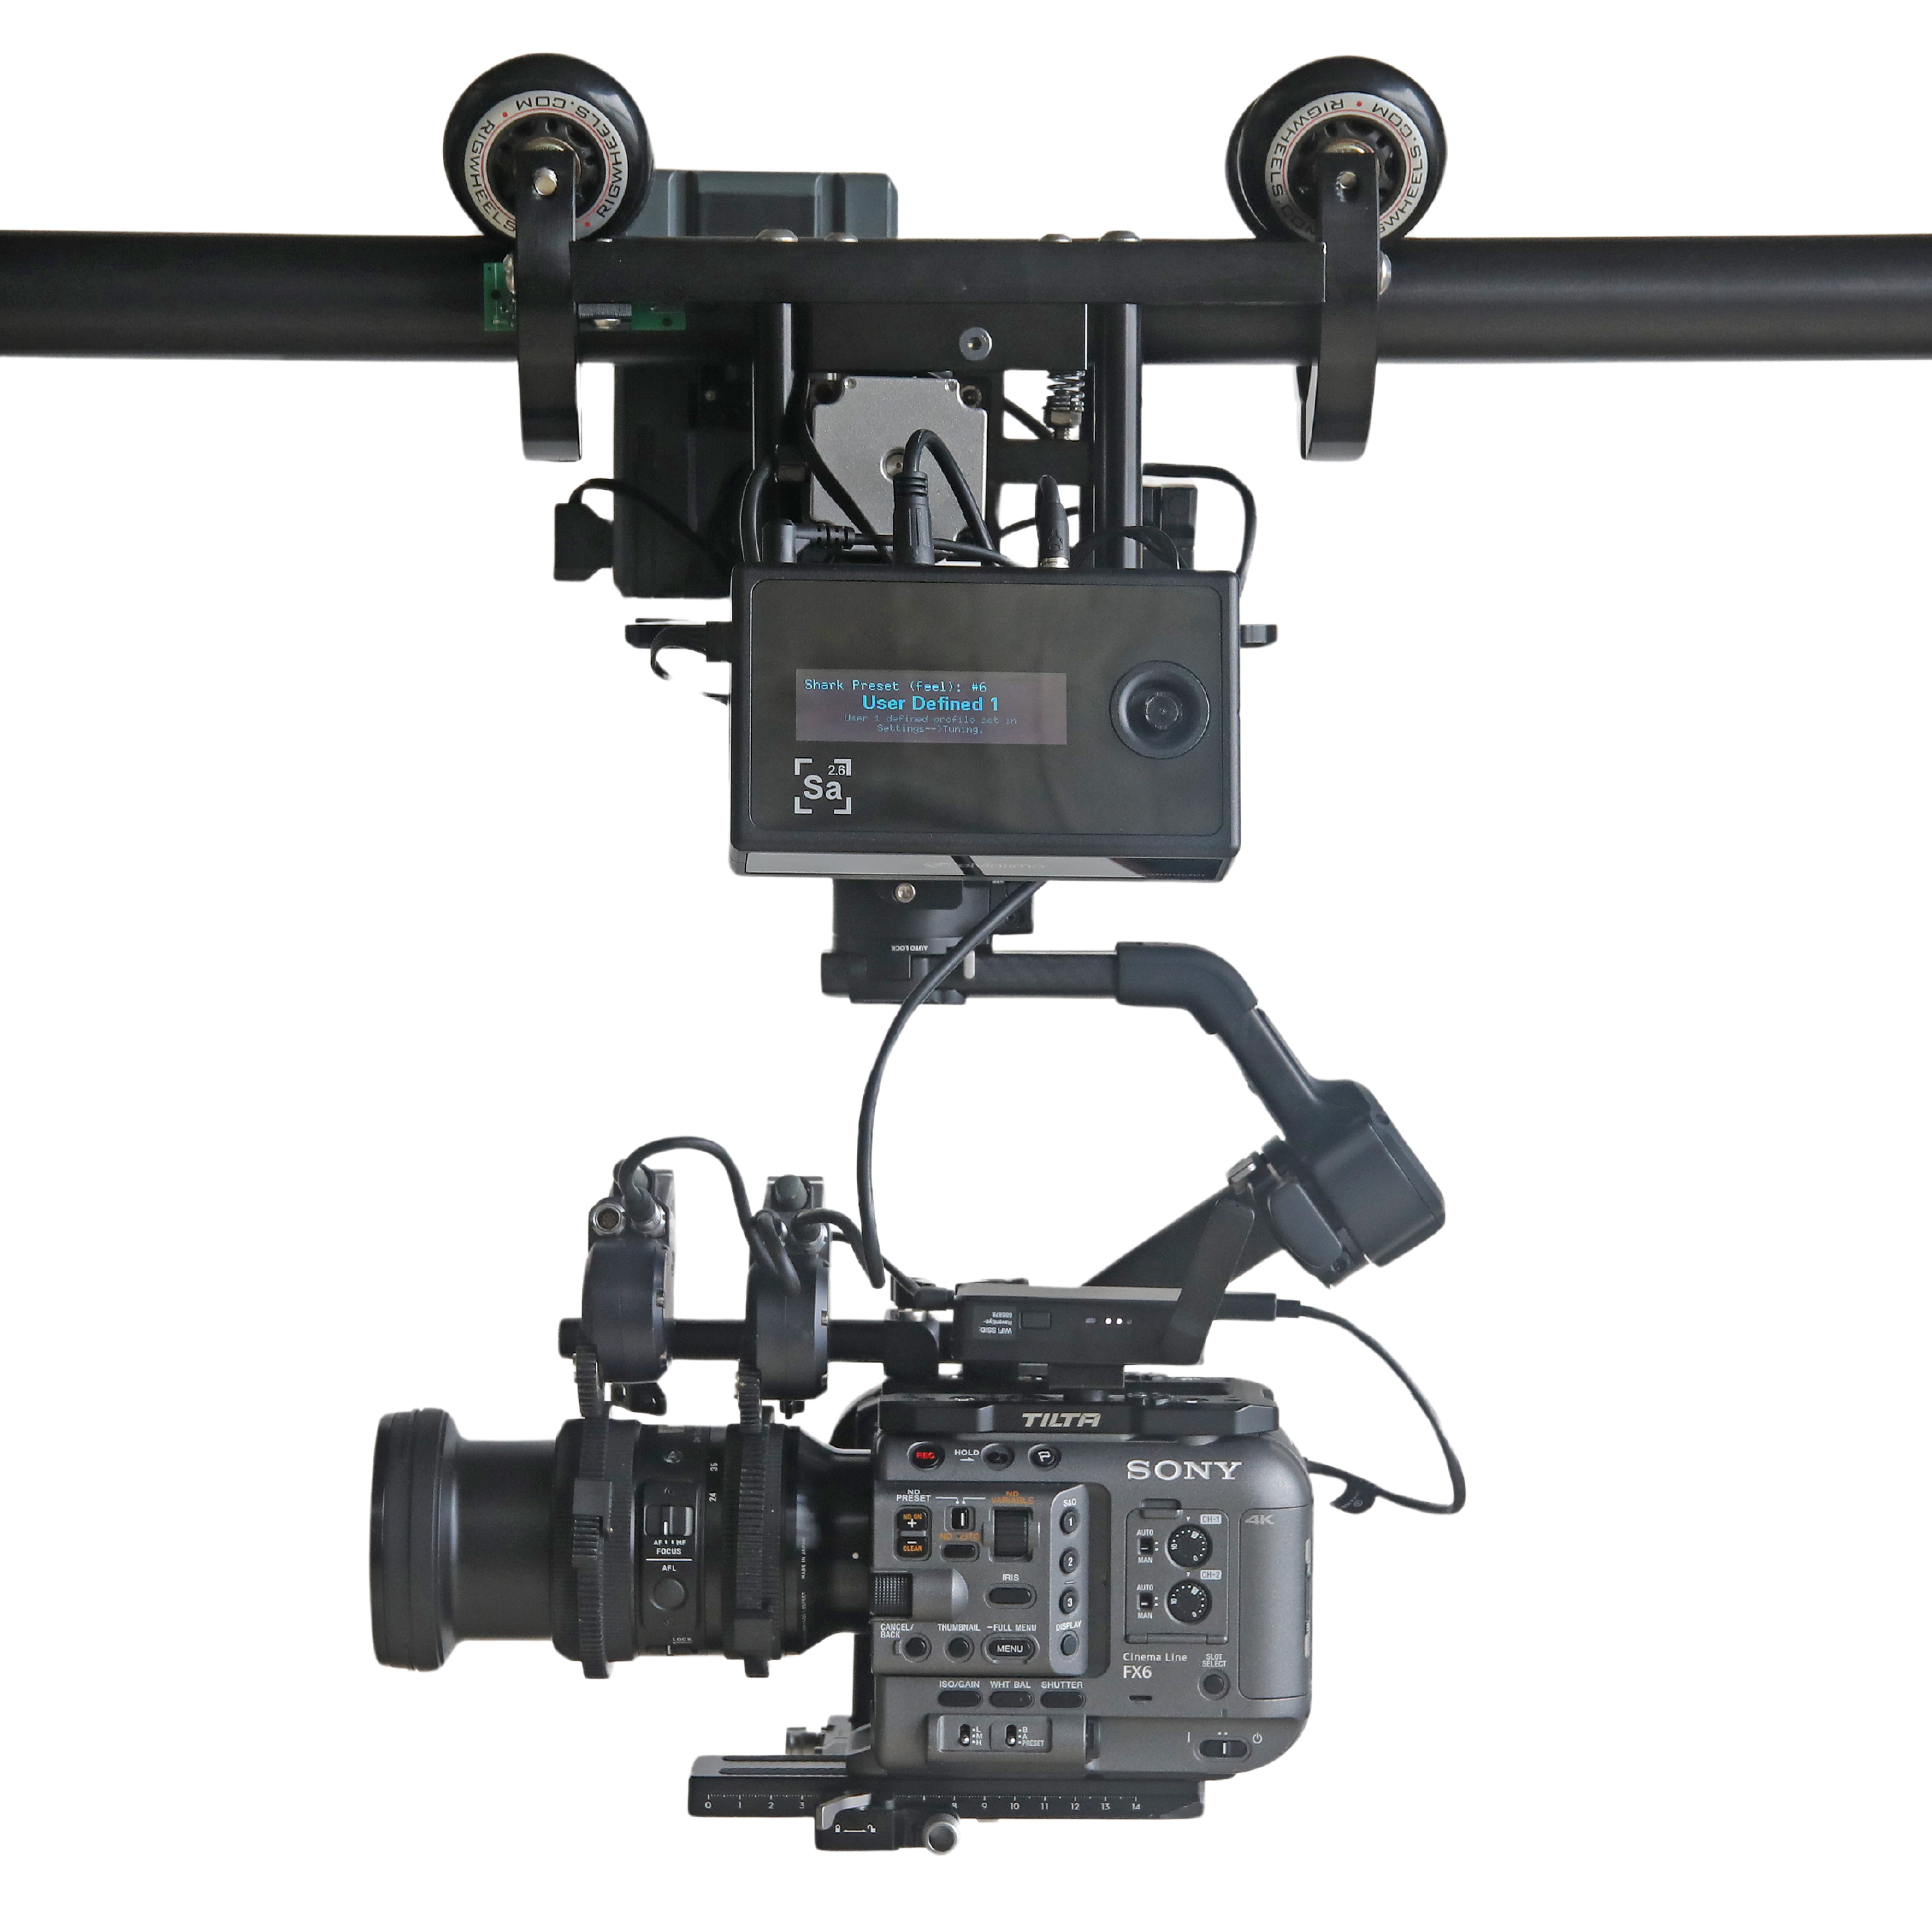
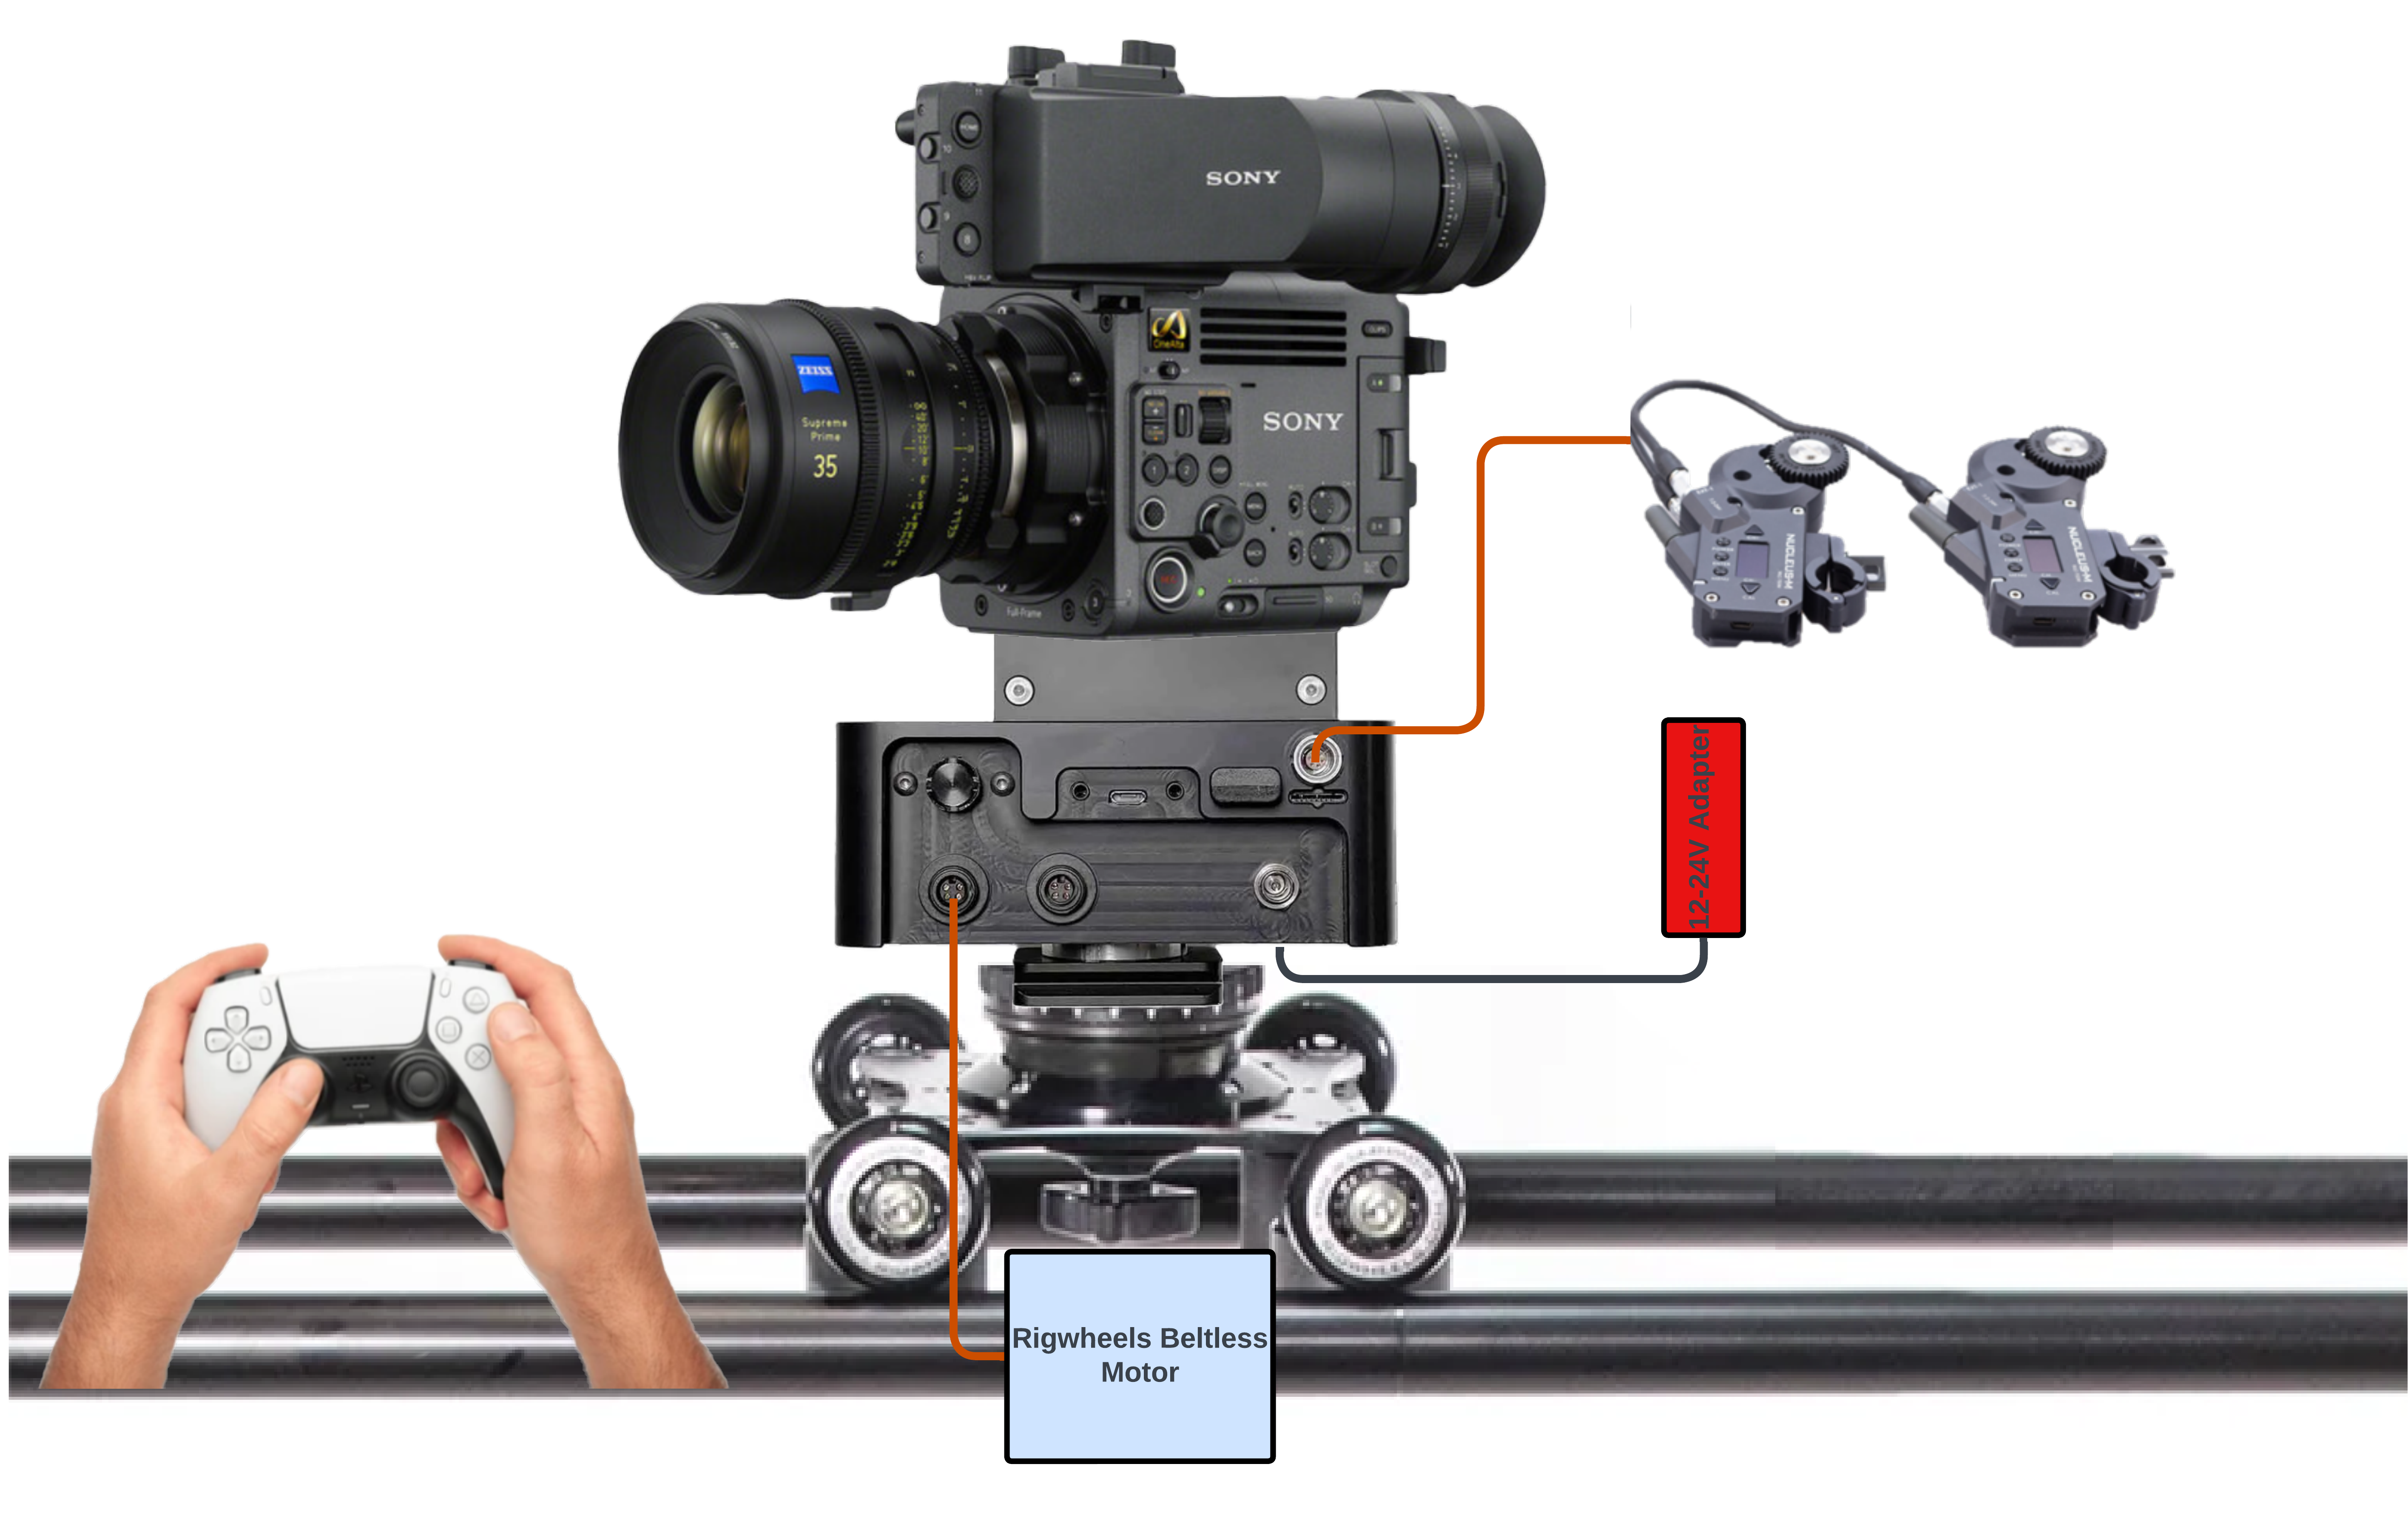
The Monorail is one of the most innovative new ways to move small to medium cameras. It supports ping-pong automation shots, cinematic and timed presets, and live control. It has a single rail for support that can extend indefinitely (with middle hanger supports every 10 feet) in positions where other linear solutions can't go. It supports cameras up to 10 lb mounted on DJI RS gimbals. The entire solution (Pan/Tilt/Roll/Slide/Focus/Zoom) is controlled and coordinated by eMotimo's Conductor SA2.6 motion controller. You can control it locally with a gaming controller, or from the control room when connected to a wired network.
Rigged Up

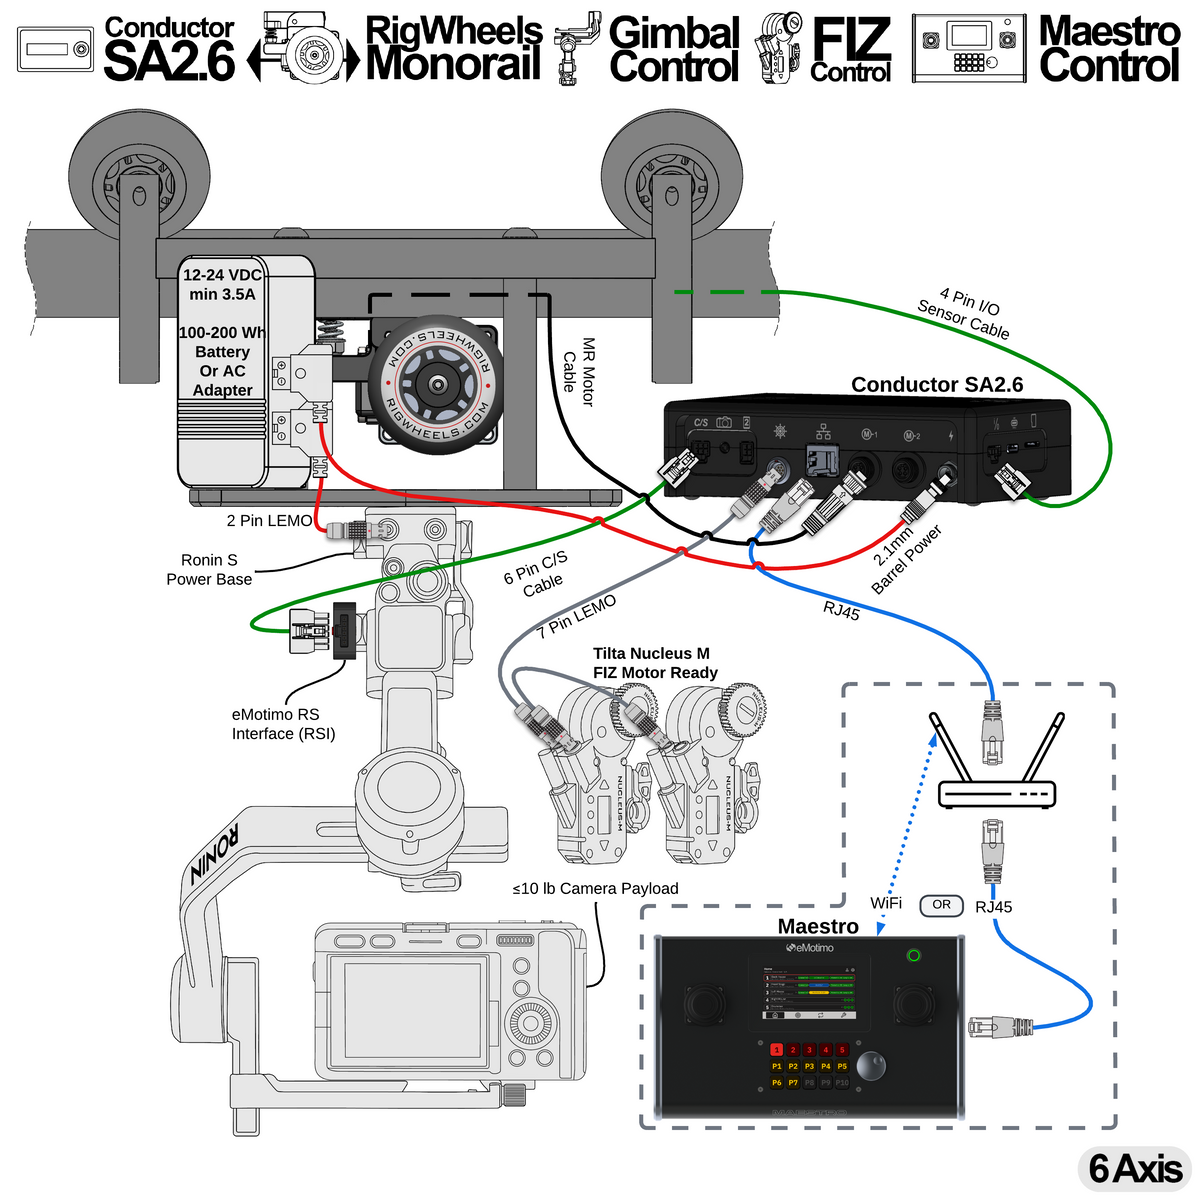
A12.0: Control a Monorail, DJI RS Gimbal, and FIZ Motors with Maestro

Features:
- Motorized RigWheels Monorail with track sensors
- Coordinated pan, tilt, roll, slide, focus, and zoom motion
- Physical inputs for every eMotimo axis of control
- Tune live-control speed and feel for each axis, map axes to the preferred inputs, and reverse direction when needed
- Maestro automatically discovers eMotimo controllers on the same network
- Set and recall 30 timed, cinematic presets
- Set and run 8 timed, cinematic loops
- Power-on positioning gets the system ready within five minutes of startup. Saved presets and loops load automatically, so operators do not have to recreate their shots each time they power on.
- Switch between connected camera rigs from Maestro’s touchscreen or built-in Stream Deck keys
- Battery or AC operation for Conductor SA2.6
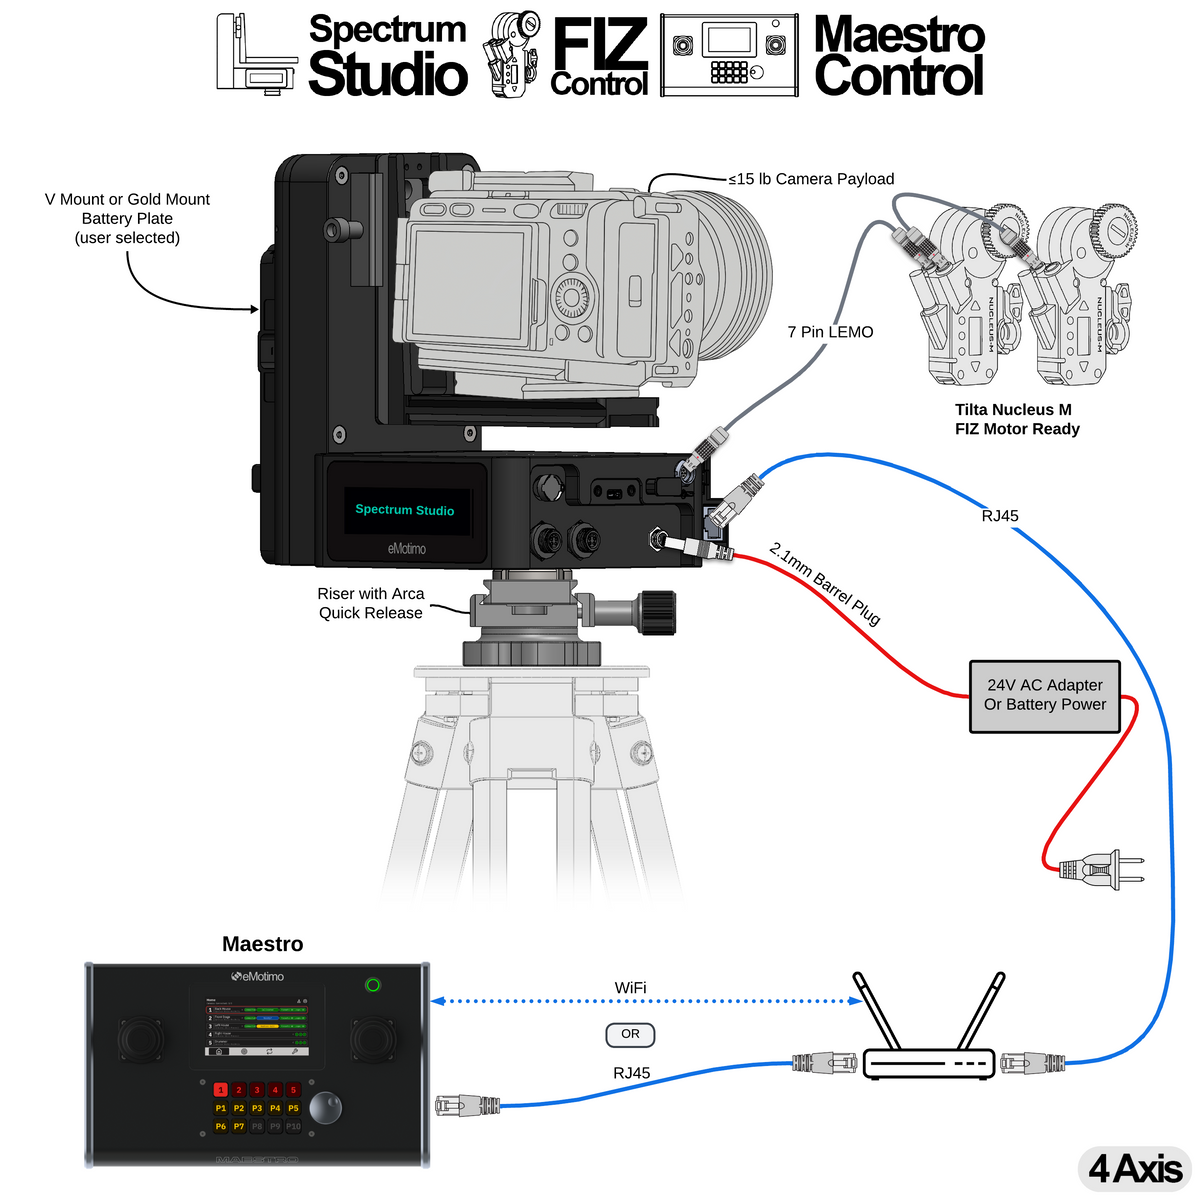
- DJI RS gimbal control with camera payloads up to 10 lb (gimbal limited)
- Power and control for Tilta Nucleus-M and Nucleus-M II FIZ motors
What do you need from eMotimo?
What else do you need from a third party?
- Compatible DJI RS gimbal and its power base
- Two Tilta Nucleus-M or Nucleus-M II motors and the required cables
- Battery with D-Tap output or a compatible DC supply for the gimbal/camera
- Ethernet cabling and a network connection for Maestro and Conductor SA2.6
Steps to program:
- Power on Conductor SA2.6 and Maestro on the same network. Maestro discovers the controller automatically.
- Select the rig on Maestro. Use its physical inputs to frame the shot and adjust axis mapping, speed, and feel.
- Save the start and end positions as timed presets.
- Create a loop between those presets and set its move timing.
- Start and stop the loop from Maestro’s built-in Stream Deck keys.
At the next startup, power-on positioning restores the saved setup and gets the rig ready within five minutes.
A12.1: Control a Monorail, Gimbal, and FIZ Motors Over a Network with Bitfocus Companion

Features:
- Motorized RigWheels Monorail with track sensors
- pan, tilt, roll, slide, focus, and zoom move together in coordinated shots
-
Cinematic Studio Ready
- Live control
- Set and recall 30 timed, cinematic presets
- Set and recall 8 timed, cinematic loops (ping-pong)
- Battery or AC operation
- Supports camera payloads up to 10 lb (RS Gimbal Limited)
- Controls DJI RS2/3/4 Pro gimbal
- Powers and controls Tilta Nucleus-M and Nucleus-M II FIZ motors
- Control locally with the included gaming controller
- Needs just 1 foot of space from wall to mount
What do you need from eMotimo?
What else do you need from a third party?
- Two Tilta Nucleus-M or Nucleus-M II motors and the required cables
- DJI RS 4 Pro Gimbal (RS 2, 2 Pro, 3, 3 Pro, 4, and 4 Pro supported)
- Power Base for Gimbal (we recommend SmallRig Power Supply Base Plate for DJI RS)
- V-Mount or Gold Mount battery with D-Tap output for battery operation or 14–16 V DC power for Gimbal/Camera DTAP distribution (breaks out the connection from the battery ) Battery Mounting Cold Shoe - clamp or bolt on a battery to the monorail.
- Computer with Bitfocus Companion installed
- Elgato Stream Deck XL (recommended for Bitfocus Companion)
Steps to program:
- Power on Conductor SA2.6 and connect the computer running Bitfocus Companion to the same wired network.
- Configure the eMotimo connection and assign live-control, preset, and loop actions through the Stream Deck.
- Use Companion to frame two positions and set a preset at each one.
- Use Companion’s loop actions to select those presets as the endpoints and set the move timing.
- Start and stop the loop through the connected Stream Deck.
For network controller configuration, see the Bitfocus Companion setup guide.
A12.2: Control a Monorail, Gimbal, and FIZ Motors Over a Network with Skaarhoj

Features:
- Motorized RigWheels Monorail with track sensors
- pan, tilt, roll, slide, focus, and zoom move together in coordinated shots
-
Cinematic Studio Ready
- Live control
- Set and recall 30 timed, cinematic presets
- Set and recall 8 timed, cinematic loops (ping-pong)
- Battery or AC operation
- Supports camera payloads up to 10 lb (RS Gimbal Limited)
- Controls DJI RS2/3/4 Pro gimbal
- Powers and controls Tilta Nucleus-M and Nucleus-M II FIZ motors
- Control locally with the included gaming controller
- Needs just 1 foot of space from wall to mount
What do you need from eMotimo?
What else do you need from a third party?
- Two Tilta Nucleus-M or Nucleus-M II motors and the required cables
- DJI RS 4 Pro Gimbal (RS 2, 2 Pro, 3, 3 Pro, 4, and 4 Pro supported)
- Power Base for Gimbal (we recommend SmallRig Power Supply Base Plate for DJI RS)
- V-Mount or Gold Mount battery with D-Tap output for battery operation or 14–16 V DC power for Gimbal/Camera DTAP distribution (breaks out the connection from the battery ) Battery Mounting Cold Shoe - clamp or bolt on a battery to the monorail.
- Computer with Bitfocus Companion installed
- Skaarhoj controller (PTZ Fly or PTZ Extreme recommended)
Steps to program:
- Power on Conductor SA2.6 and connect the Skaarhoj controller to the same wired network.
- Use the Skaarhoj controls to frame two positions and set a preset at each one.
- On the Skaarhoj looping page, select a loop and assign the two presets as points A and B.
- Set the loop timing, then start and stop the loop from Skaarhoj.
For network controller configuration, see the Skaarhoj setup guide.
A12.3: Control a Monorail, Gimbal, and FIZ Motors with a Gaming Controller

Features:
- Motorized RigWheels Monorail with track sensors
- pan, tilt, roll, slide, focus, and zoom move together in coordinated shots
-
Cinematic Studio Ready
- Live control
- Set and recall 30 timed, cinematic presets
- Set and recall 8 timed, cinematic loops (ping-pong)
- Battery or AC operation
- Supports camera payloads up to 10 lb (RS Gimbal Limited)
- Controls DJI RS2/3/4 Pro gimbal
- Powers and controls Tilta Nucleus-M and Nucleus-M II FIZ motors
- Control locally with the included gaming controller
- Needs just 1 foot of space from wall to mount
What do you need from eMotimo?
What else do you need from a third party?
- Two Tilta Nucleus-M or Nucleus-M II motors and the required cables
- DJI RS 4 Pro Gimbal (RS 2, 2 Pro, 3, 3 Pro, 4, and 4 Pro supported)
- Power Base for Gimbal (we recommend SmallRig Power Supply Base Plate for DJI RS)
- V-Mount or Gold Mount battery with D-Tap output for battery operation or 14–16 V DC power for Gimbal/Camera DTAP distribution (breaks out the connection from the battery ) Battery Mounting Cold Shoe - clamp or bolt on a battery to the monorail.
Steps to program:
- Power on Conductor SA2.6 and pair the included gaming controller.
- Use the gaming controller to position the rig and select Guided Mode, then Ping-Pong.
- Set the start and end points using the gaming controller.
- Set the move speed if needed, then start the shot from the gaming controller.
A12.4: Monorail PTZ Mover with Bitfocus Companion Control

Features:
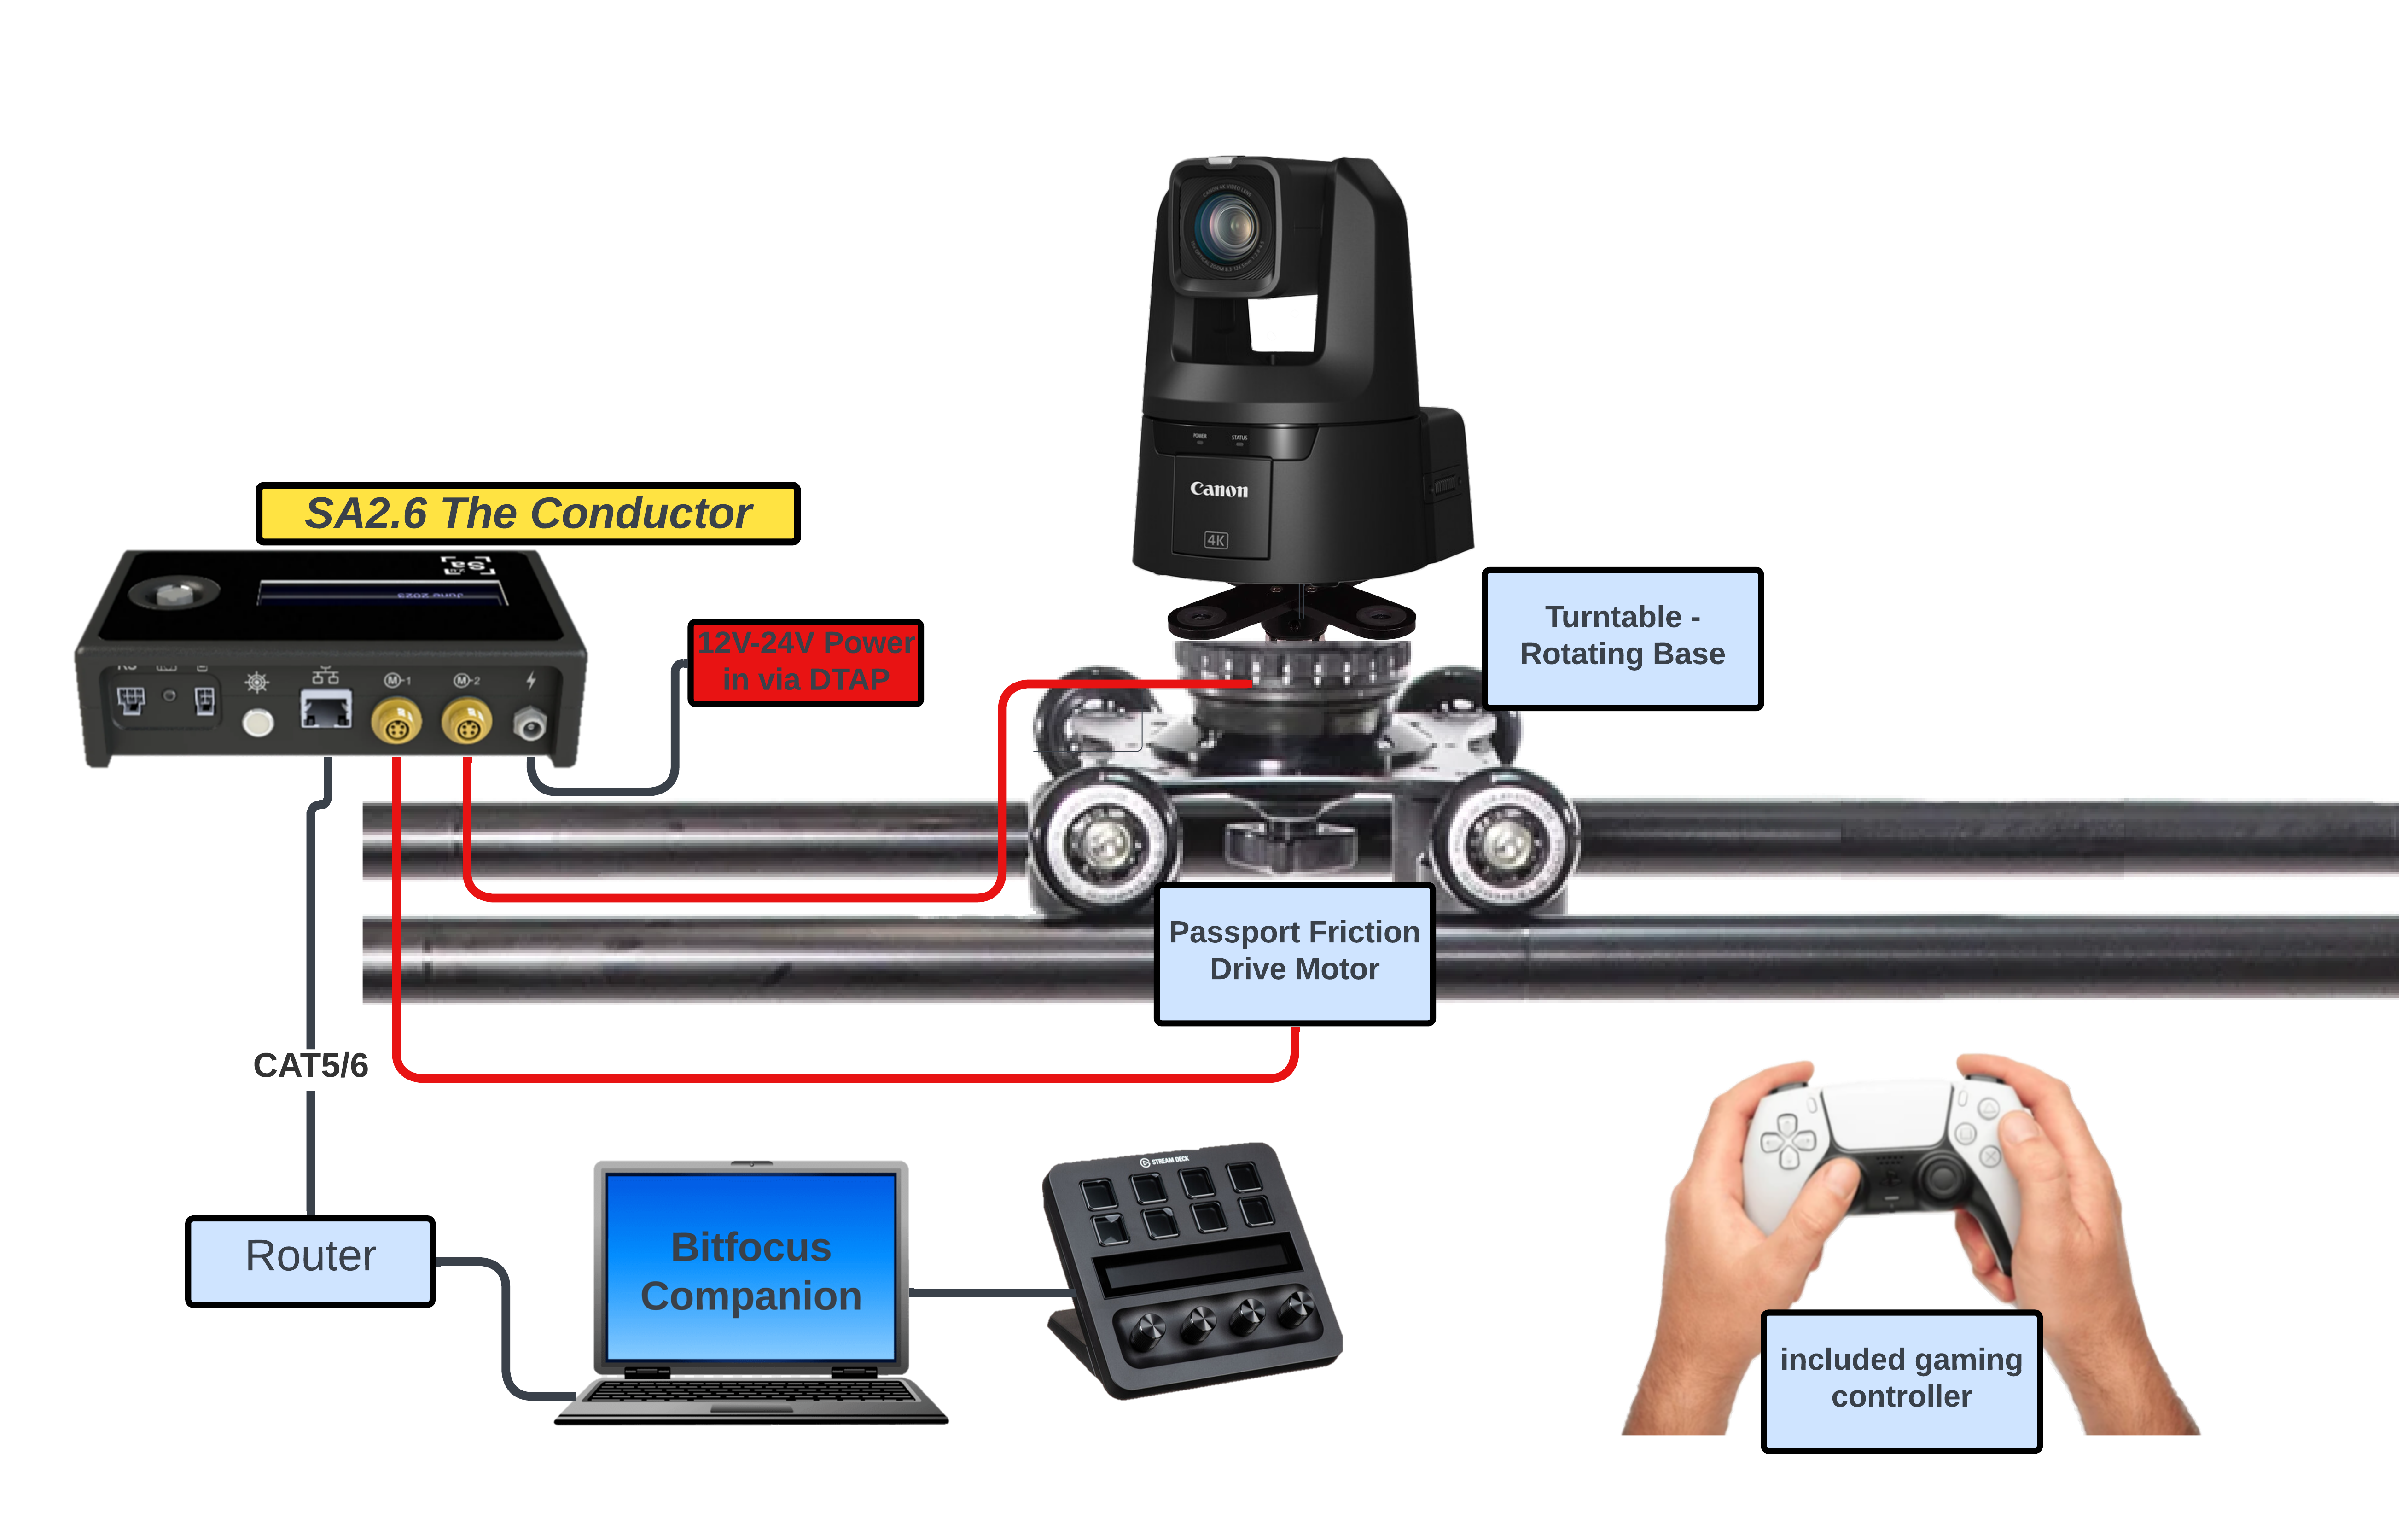
- Position the PTZ camera remotely or run a ping-pong AutoDolly loop
- Motorized RigWheels Monorail with track sensors
-
Cinematic Studio Ready
- Live control
- Set and recall 30 timed, cinematic presets
- Set and recall 8 timed, cinematic loops (ping-pong)
- Wall power for Conductor SA2.6 and the PTZ camera
- Needs just 1 foot of space from wall to mount
What do you need from eMotimo?
- Conductor SA2.6 + Monorail Integration Kit + RigWheels Monorail Kit
- Riser with Clamp and 100mm Arca Plate (recommended for mounting the PTZ camera to the monorail)
What else do you need from a third party?
- PTZ camera of your choice
- Computer with Bitfocus Companion installed
- Elgato Stream Deck XL (recommended for Bitfocus Companion)
- Wall power for Conductor SA2.6 and the PTZ camera (Conductor AC adapter included with the bundle; use the camera’s compatible AC supply)
Steps to program:
- Power on Conductor SA2.6 and connect the computer running Bitfocus Companion to the same wired network.
- Configure the eMotimo connection and assign live-control, preset, and loop actions through the Stream Deck.
- Use Companion to frame two positions and set a preset at each one.
- Use Companion’s loop actions to select those presets as the endpoints and set the move timing.
- Start and stop the loop through the connected Stream Deck.
For network controller configuration, see the Bitfocus Companion setup guide.
A12.5: Monorail PTZ Mover with Skaarhoj Control

Features:
- Position the PTZ camera remotely or run a ping-pong AutoDolly loop
- Motorized RigWheels Monorail with track sensors
-
Cinematic Studio Ready
- Live control
- Set and recall 30 timed, cinematic presets
- Set and recall 8 timed, cinematic loops (ping-pong)
- Wall power for Conductor SA2.6 and the PTZ camera
- Needs just 1 foot of space from wall to mount
What do you need from eMotimo?
- Conductor SA2.6 + Monorail Integration Kit + RigWheels Monorail Kit
- Riser with Clamp and 100mm Arca Plate (recommended for mounting the PTZ camera to the monorail)
What else do you need from a third party?
- PTZ camera of your choice
- Skaarhoj controller (PTZ Fly or PTZ Extreme recommended)
- Wall power for Conductor SA2.6 and the PTZ camera (Conductor AC adapter included with the bundle; use the camera’s compatible AC supply)
Steps to program:
- Power on Conductor SA2.6 and connect the Skaarhoj controller to the same wired network.
- Use the Skaarhoj controls to frame two positions and set a preset at each one.
- On the Skaarhoj looping page, select a loop and assign the two presets as points A and B.
- Set the loop timing, then start and stop the loop from Skaarhoj.
For network controller configuration, see the Skaarhoj setup guide.
A12.6: Move a PTZ Camera on a RigWheels Monorail with Maestro

Features:
- Motorized RigWheels Monorail with track sensors
- Live control of camera travel along the track
- Physical inputs for every eMotimo axis of control
- Tune live-control speed and feel for each axis, map axes to the preferred inputs, and reverse direction when needed
- Maestro automatically discovers eMotimo controllers on the same network
- Set and recall 30 timed, cinematic presets
- Set and run 8 timed, cinematic loops
- Power-on positioning gets the system ready within five minutes of startup. Saved presets and loops load automatically, so operators do not have to recreate their shots each time they power on.
- Switch between connected camera rigs from Maestro’s touchscreen or built-in Stream Deck keys
- Wall power for Conductor SA2.6 and the PTZ camera
What do you need from eMotimo?
- Maestro Network Controller
- Conductor SA2.6 + Monorail Integration Kit + RigWheels Monorail Kit
- Riser with Clamp and 100 mm Arca Plate (recommended for mounting the PTZ camera)
What else do you need from a third party?
- PTZ camera of your choice
- Ethernet cabling and a network connection for Maestro and Conductor SA2.6
- Wall power for Conductor SA2.6 and the PTZ camera (Conductor AC adapter included with the bundle; use the camera’s compatible AC supply)
Steps to program:
- Power on Conductor SA2.6 and Maestro on the same network. Maestro discovers the controller automatically.
- Select the rig on Maestro. Use its physical inputs to frame the shot and adjust axis mapping, speed, and feel.
- Save the start and end positions as timed presets.
- Create a loop between those presets and set its move timing.
- Start and stop the loop from Maestro’s built-in Stream Deck keys.
At the next startup, power-on positioning restores the saved setup and gets the rig ready within five minutes.